Prebid SDK Android with a Custom Bidding Integration Method
- Overview
- Major Integration Steps
- Ad Operations Guidance
- Rendering Approaches
- Additional Ad Unit Configuration
- Further Reading
Overview
You can use the Prebid SDK to monetize your app with a custom ad server or even without an ad server at all.
This guide outlines how to integrate the Prebid SDK into your app if you don’t fit into any of the other approaches documented on the site. Since there are many unknown details about your specific situation, guidance will remain general.
General components:
- Prebid SDK collects parameters and sends to Prebid Server.
- Prebid server handles the bidding and auction process.
- An ad server or mediation platform without specific Prebid Mobile integration instructions.
- If this ad server has an SDK, great, otherwise, your app code will be responsible for crafting requests to the ad server based on response data pulled from Prebid SDK.
- It’s possible for your app code to just make the ad decision itself, utilizing no ad server at all.
-
Rendering method - the first big decision is about how Prebid ads will be rendered:
- Either in a webview with the Prebid Universal Creative
- Or delegate the rendering to Prebid SDK
- The tradeoffs are discussed below
General Approaches
Custom integrations will need to determine whether they want to utilize Prebid SDK’s full rendering capacity, or just obtain bids to do their own rendering.
Custom Bidding Only

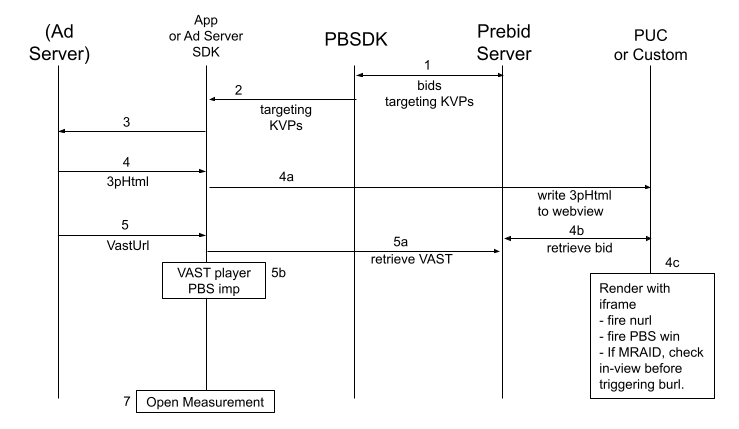
- Prebid SDK calls Prebid Server which supplies one or more bids.
- The app inspects the targeting values.
- Something makes an ad decision - either your ad server or your app.
- If a 3rd party HTML creative is chosen (banner or interstitial):
- The HTML should be written to a webview, optionally using the Prebid Universal Creative (PUC).
- The PUC or your custom rendering code loads the winning creative from Prebid Cache.
- The PUC or your custom rendering code writes this creative into an iframe and hits all the tracking strings: Prebid win URL, billing url (burl), and notice url (nurl).
- If MRAID is available, the PUC uses it to consider the view state before hitting the burl.
- If a video VastUrl creative is chosen:
- The platform video player loads the VAST from Prebid Cache.
- It then starts playing the VAST, hitting the embedded Impression tags when appropriate.
- Your app code will need to handle Open Measurement SDK interactions.
Custom Prebid Rendered

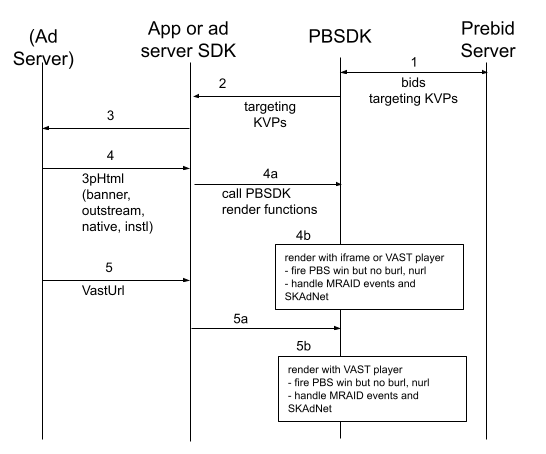
- Prebid SDK calls Prebid Server which supplies one or more bids.
- The app inspects the targeting values.
- Something makes an ad decision - either your ad server or your app.
- If a 3rd party HTML creative is chosen (banner, native, interstitial, non-instream video):
- The app calls Prebid SDK rendering functions.
- If a video VastUrl creative is chosen (rewarded video only):
- The app calls Prebid SDK rendering functions.
Tradeoffs
Here are the tradeoffs between two integration approaches:
| Aspect | Bidding-Only Integration | Prebid-Rendered Integration |
|---|---|---|
| Direct access to bids | ||
| Support for MRAID 3.0 | ||
| Support for SKAdnetwork | ||
| Loads data from Prebid Cache | ||
| Supports instream video | ||
| Triggers billing and Notice URLs | ||
| Supports Third Party Rendering libraries |
Notes:
- On one hand, using Prebid Cache reduces the amount of data that must be sent to the mobile device – the body of the creative does not need to be transmitted for bids. On the other hand, though, when a bid wins in the ad server, the body of the creative must be retrieved from the cache.
- It is possible to mix-and-match implementations within an app. e.g. you could implement instream video with the Bidding-Only approach and other adunits with Prebid-Rendered.
- Over time, we expect the “Prebid-Rendered” approach to mature and become the obvious choice.
Prerequisites
- Prebid SDK - You will need the latest version of the Prebid Mobile SDK for either Android or iOS.
- Prebid Universal Creative - If you choose the “Bidding-Only” approach, the PUC needs to be hosted on a CDN.
- Video player - If you let Prebid SDK do the rendering, it will use the platform default: AVPlayer for iOS and ExoPlayer for Android.
-
Prebid Server - You will need a cluster of servers running Prebid Server. You can set up your own Prebid Server or work with a Prebid Server managed service. Prebid Server provides you with the following:
- Configuration storage - rather than hardcoding all the details of your current business arrangements in the app, Prebid Server stores which bidders you’re currently working with, their inventory details, and other settings that can be changed without updating your app.
- Server-side auction - the server will make the connections to multiple auction bidding partners so the app doesn’t have to.
- Privacy regulation tools - the server can help your legal team meet different regulatory needs in different jurisdictions by configuring various protocols and anonyimization activities.
Major Integration Steps
The technical implementation of Prebid mobile into your app will involve these major steps:
- Initialize the Prebid SDK - create a connection to your Prebid Server.
- Set Global Parameters - let bidders know important data about the page, privacy consent, and other settings.
- Work with your Prebid Server team to create the adunit configIds that will be used in the app.
- Set up ad server orders, line items, and creatives. See AdOps guidance
- Link Prebid AdUnit code to your AdUnits - for any adunits that your business team wants to connect to Prebid with the configIds generated in Step 3. See the adunit-specific instructions below.
Ad Operations Guidance
If you’re using an ad server, the Ad Operations team will need to create line items. If you’re not using an ad server, the app code will need to generate an appropriate response to render the winning ad.
The creatives used depend on which media formats your adunits can utilize. The details for what creatives are needed for each ad format will depend on the type of integration:
Rendering Approaches
The code implementation details depend on which rendering approach you’ve chosen:
Bidding Only
While the default ad server for Prebid’s Mobile SDK is GAM, it can be expanded to include support for 3rd party ad servers through the fetchDemand function. This function returns the Prebid Server bidder key/values (targeting keys), which can then be passed to the ad server of choice.
In this mode, the developer is responsible for the following actions:
- Call
fetchDemand()with extended targetingDict callback (The method has been removed in the PrebidMobile3.0.0. Use thefetchDemand()with extended BidInfo callback instead) - Retrieve targeting keys from the extended fetchDemand function
- Convert targeting keys into the format for your ad server
- Pass converted keys to your ad server
- Render ad with Prebid Universal Creative or custom renderer
This approach is available for the following ad formats:
- Display Banner via
BannerAdUnit - Video Banner and Instream Video via
VideoAdUnit(The class has been removed in the PrebidMobile3.0.0. Use theInStreamVideoAdUnitinstead) - Display Interstitial via
InterstitialAdUnit - Video Interstitial via
VideoInterstitialAdUnit(The class has been removed in the PrebidMobile3.0.0. Use theInterstitialAdUnitwith video ad format instead) - Rewarded Video via
RewardedVideoAdUnit - Native Styles via
NativeRequest
The basic steps for these ad units you can find on the page for GAM Bidding Only integration. The difference is that you should use the fetchDemand function with the following signature:
public void fetchDemand(OnFetchDemandResult listener) { ... }

public interface OnFetchDemandResult {
    void onComplete(@NonNull BidInfo bidInfo);
}
Examples:
adUnit?.fetchDemand { bidInfo ->
    if(bidInfo.getResultCode() == ResultCode.SUCCESS) {
        val keywords = bidInfo.targetingKeywords

        makeAdRequest(keywords)
    }
}
The BidInfo provides the following properties:
-
resultCode- the object of typeResultCodedescribing the status of the bid response. -
targetingKeywords- the targeting keywords of the winning bid -
exp- the number of seconds that may elapse between the auction and the actual impression. In this case, it indicates the approximate TTL of the bid in the Prebid Cache. Note that the actual expiration time of the bid will be less than this number due to the network and operational overhead. The Prebid SDK doesn’t make any adjustments to this value. -
nativeAdCacheId- the local cache ID of the winning bid. Applied only to thenativead format. -
events- the map of some publically available event URLs attached to the bid. These can be used to enable Prebid Server-based analytics when the Prebid Universal Creative (PUC) is not involved in the rendering process. If the PUC is used for rendering, it will take care of hitting these events. These are the available event URLs:-
EVENT_WIN - this bid was chosen by the ad server as the one to display. This is the main metric for banner and native. This returns the OpenRTB
seatbid.bid.ext.prebid.events.winfield. (requires SDK v2.1.6) -
EVENT_IMP - the ad creative for this bid was actually displayed. This is often the main metric for video ads. This returns the OpenRTB
seatbid.bid.ext.prebid.events.impfield. (requires SDK v2.1.6)
-
EVENT_WIN - this bid was chosen by the ad server as the one to display. This is the main metric for banner and native. This returns the OpenRTB
Code sample to extract the events:
val win = bidInfo.events.get(BidInfo.EVENT_WIN)
val imp = bidInfo.get(BidInfo.EVENT_IMP)
Prebid Rendered
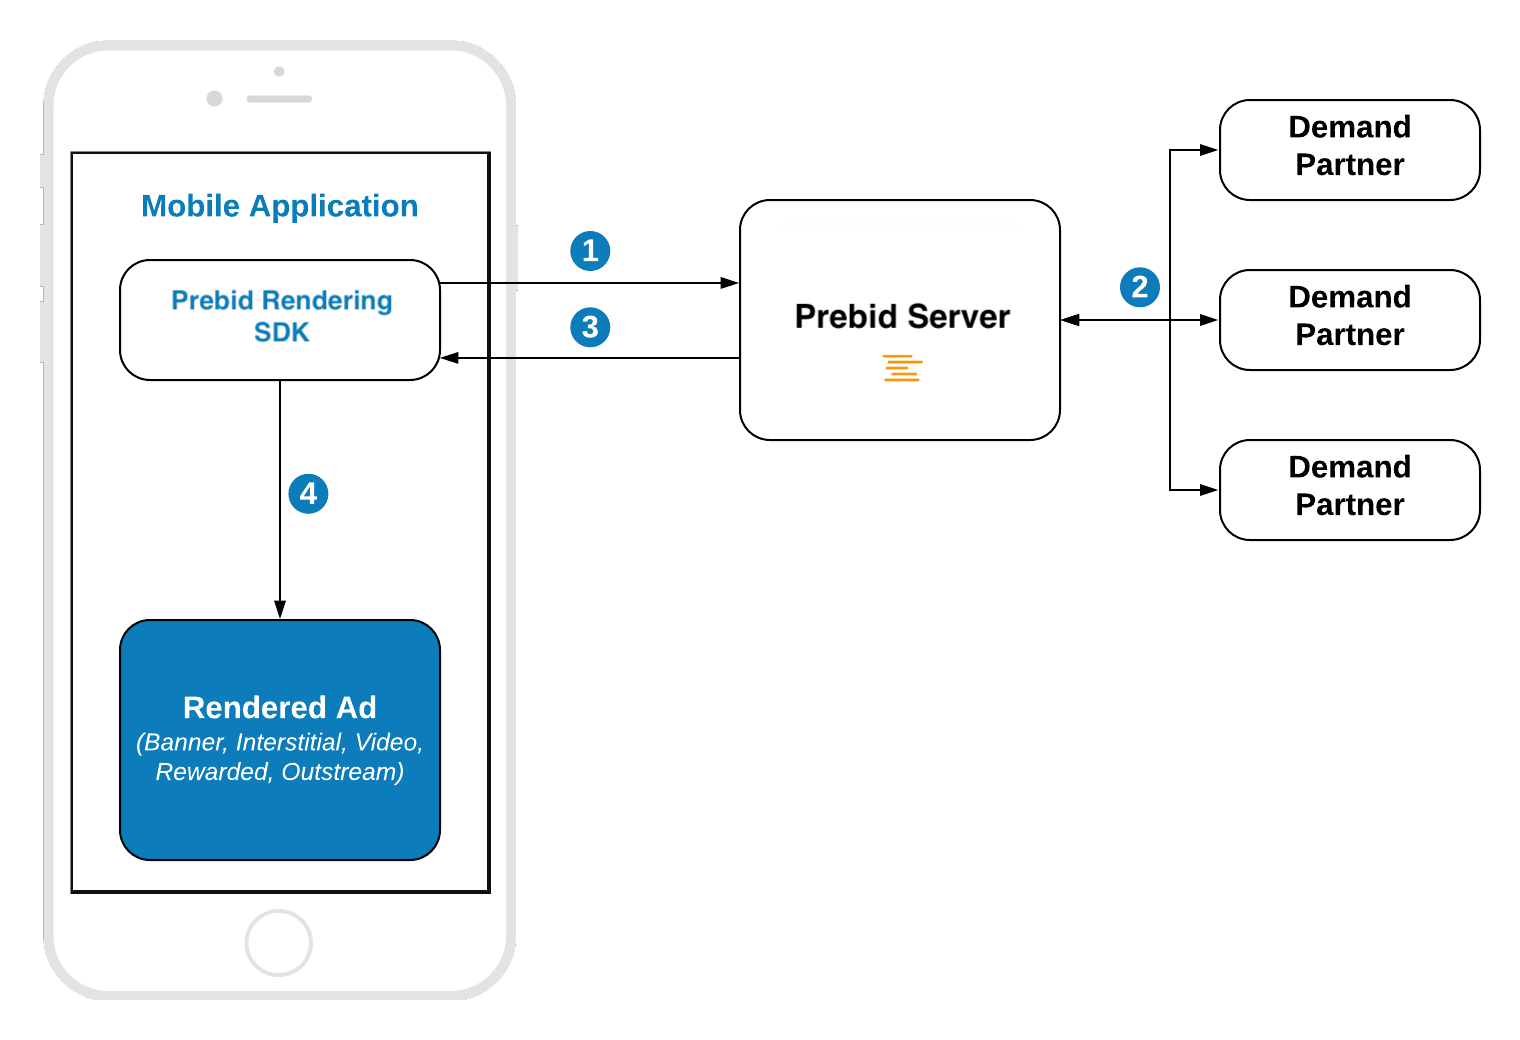
The integration and usage of the Rendering API is similar to any other ad SDK. It sends the bid requests to the Prebid Server and renders the winning bid.

HTML Banner
Integration example:
// 1. Create an Ad View
bannerView = BannerView(requireContext(), configId, adSize)
bannerView?.setBannerListener(this)

// Add view to viewContainer
viewContainer?.addView(bannerView)

// 2. Load ad
bannerView?.loadAd()
loadAd() should be called on the main thread.
Step 1: Create Ad View
Initialize the BannerAdView with properties:
-
configId- an ID of a Stored Impression on the Prebid server -
size- the size of the ad unit which will be used in the bid request.
Step 2: Load the Ad
Call loadAd() and SDK will:
- make bid request to Prebid
- render the winning bid on display
Banner Video (non-instream)
Banner Video is the same as HTML banner, but you will also need to specify the bannerView.videoPlacementType:
bannerView.videoPlacementType = PlacementType.IN_BANNER // or any other available type
Interstitials
Integration example:
// 1. Create an Interstitial Ad Unit
interstitialAdUnit = InterstitialAdUnit(requireContext(), configId, minSizePercentage)
interstitialAdUnit?.setInterstitialAdUnitListener(this)

// 2. Load Ad
interstitialAdUnit?.loadAd()
// .....

// 3. Show the ad
interstitialAdUnit?.show()
loadAd() should be called on the main thread.
In order to make a multiformat bid request, set the respective values into the adUnitFormats parameter.
interstitialAdUnit = InterstitialAdUnit(
                        requireContext(),
                        configId,
                        EnumSet.of(AdUnitFormat.BANNER, AdUnitFormat.VIDEO))
Step 1: Create an Ad Unit
Initialize the InterstitialAdUnit with properties:
-
configId- an ID of a Stored Impression on the Prebid server -
minSizePercentage- specifies the minimum width and height percent an ad may occupy of a device’s real estate.
You can also assign the listener to process ad events.
NOTE: the
minSizePercentage- plays an important role in the bidding process for display ads. If the provided space is not enough demand partners won’t respond with bids.
Step 2: Load the Ad
Call the loadAd() to make a bid request.
Step 3: Show the Ad when it is ready
Wait until the ad is loaded and present it to the user in any suitable time.
override fun onAdLoaded(interstitialAdUnit: InterstitialAdUnit) {
    //Ad is ready for display
}
Rewarded
Server-side Rewarded Ad Unit Configuration
The Rewarded Ad Unit assumes special behavior that should be configurable by the platform or publisher according to the application or ad experience guides.
Configuration of rewarded ad unit can be done by defining the Prebid Server passthrough extension or by using a stored impression-level request on the server.
Prebid SDK will search for a particular rwdd object in $.seatbid.bid.ext.prebid.passthrough of bid response to configure the behavior and rendering of the Rewarded Ad Unit. The following table describes the structure and usage purpose of rwdd configuration parameters.
| Attribute | Type | Description | Example |
|---|---|---|---|
reward |
object (optional) |
Metadata provided by the publisher to describe the reward. | { |
reward.type |
string | Type of the reward in the app’s coins. | "SuperDollars" |
reward.count |
integer | Amount of coins. | 10 |
reward.ext |
object | For future extensions. | { |
completion |
object (optional) |
Describes the condition when the SDK should send a signal to the app that the user has earned the reward. | { |
completion.banner |
object | Details for banner ad completion. | { |
completion.banner.time |
integer | Period of time the banner ad is on screen. | 5 |
completion.banner.event |
string | URL with custom schema sent by the creative to indicate that the user did earn a reward. | "rwdd://userDidEarnReward" |
completion.video |
object | Details for video ad completion. | { |
completion.video.time |
integer | Period of time the video ad is on screen. | 10 |
completion.video.playbackevent |
string | The playback event stage in the video. |
"start", "firstquartile", "midpoint", "thirdquartile", "complete"
|
completion.video.endcard |
object | Properties for the end card. | { |
completion.video.endcard.time |
integer | Period of time the end card is on screen. | 5 |
completion.video.endcard.event |
string | URL with custom schema sent by the creative for end card. | "rwdd://userDidEarnReward" |
close |
object (optional) |
Describes the ad close behavior after the reward is earned. | { |
close.postrewardtime |
integer | Time interval (seconds) after reward event when SDK should close interstitial. | 3 |
close.action |
string | Action SDK should make: "autoclose" (close interstitial) or "closebutton" (show close button) |
"autoclose" |
An example of an impression-level stored request:
{
  "video": {
    "h": 480,
    "w": 320,
    "mimes": ["video/mp4"],
    "linearity": 1,
    "placement": 2,
    "playbackmethod": [2]
  },
  "ext": {
    "prebid": {
      "passthrough": [
        {
          "type": "prebidmobilesdk",
          "rwdd": {
            "reward": {
              "type": "SuperDollars",
              "count": 10
            },
            "completion": {
              "video": {
                "endcard": {
                  "time": 5
                }
              }
            },
            "close": {
              "postrewardtime": 3,
              "action": "autoclose"
            }
          }
        }
      ]
    }
  }
}
More details about the SDK behavior according to the rwdd configuration you can find in the GitHub Proposal.
Integration example
// 1. Create an Ad Unit
rewardedAdUnit = RewardedAdUnit(requireContext(), configId)
rewardedAdUnit?.setRewardedAdUnitListener(this)

// 2. Execute the loadAd function
rewardedAdUnit?.loadAd()

/// .......

// After the ad is loaded you can execute `show` to trigger ad display
rewardedAdUnit?.show()
loadAd() should be called on the main thread.
Step 1: Create a Rewarded Ad Unit
Create the RewardedAdUnit object with parameters:
-
adUnitId- an ID of Stored Impression on the Prebid server.
Step 2: Load the Ad
Call the loadAd() to make a bid request.
Step 3: Show the Ad when it is ready
Wait until the ad is loaded and present it to the user in any suitable time.
override fun onAdLoaded(rewardedAdUnit: RewardedAdUnit) {
//Ad is ready for display
}
Step 4: Handle a reward
Handle earning a reward in the appropriate method. Important: a reward can be null.
override fun onUserEarnedReward(rewardedAdUnit: RewardedAdUnit?, reward: Reward?) {
    if (reward != null) {
        val rewardType = reward.type
        val rewardCount = reward.count
        val rewardExt = reward.ext
        // Process the reward
    }
}
Additional Ad Unit Configuration
Ad Position
The adPosition property allows developers to specify the position of the ad within the publisher’s content. This property maps to the pos field in the OpenRTB specification under the imp[].banner or imp[].video objects, depending on the ad format. The possible values for this field could be found in the respective specification.
You can set adPosition by using the following method:
adUnit.setAdPosition(AdPosition.FOOTER);