Prebid SDK Android with AdMob Integration Method
- Overview
- How it Works
- Major Integration Steps
- Ad Operations Guidance
- Setup
- Adunit Specific Instructions
- Additional Ad Unit Configuration
- Further Reading
Overview
Here’s how to integrate the Prebid SDK with Google AdMob.
Prerequisites
These are the required components:
- AdMob Account - This account allows you to manage and serve ads within your mobile app. Within this account you’ll need to configure your inventory for serving ads within your app.
- GMA SDK - This SDK integration is necessary to communicate with the AdMob service.
- Prebid SDK - You will need the latest version of the Prebid Mobile SDK for either Android or iOS.
- Prebid Server - You will need a cluster of servers running Prebid Server. You can set up your own Prebid Server or work with a Prebid Server managed service. Prebid Server provides you with the following:
- Configuration storage - rather than hardcoding all the details of your current business arrangements in the app, Prebid Server stores which bidders you’re currently working with, their inventory details, and other settings that can be changed without updating your app.
- Server-side auction - the server will make the connections to multiple auction bidding partners so the app doesn’t have to.
- Privacy regulation tools - the server can help your legal team meet different regulatory needs in different jurisdictions by configuring various protocols and anonyimization activities.
How it Works
Here’s how the ad bidding-auction-rendering process works in this integration scenario.
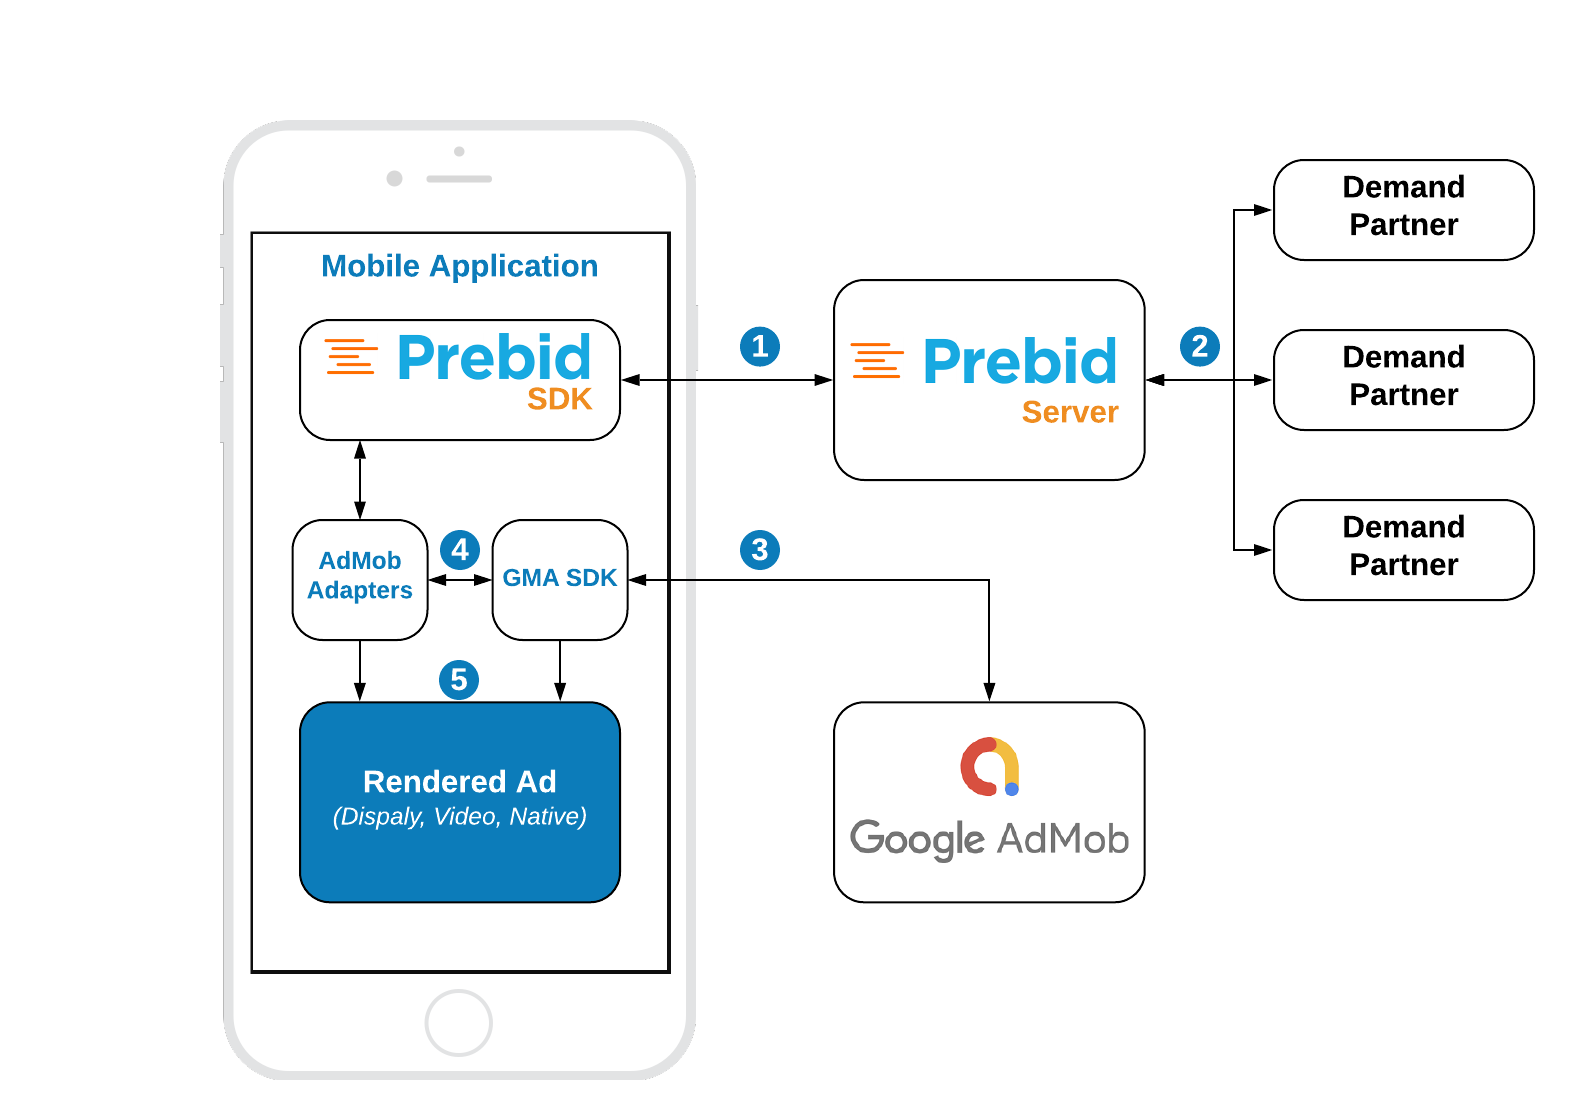
Steps 1-2 Prebid SDK makes a bid request. Prebid Server runs an auction and returns the winning bid.
Step 3 GMA SDK makes an ad request. AdMob returns the mediation chain with respective ad sources.
Step 4 For each Prebid ad source, the GMA SDK sequentially instantiates a Prebid adapter function.
Step 5 The adapter function verifies the targeting keywords of the winning bid and the server properties of the given ad source. If they match the adapter will render the winning bid. Otherwise, it will immediately fail with a “no ad” error and the next ad source will instantiate the same adapter but for another set of server params.
Major Integration Steps
Assuming your app is already integrated with the GMA SDK, the technical implementation of Prebid mobile into your app will involve these major steps:
- Initialize the Prebid SDK - create a connection to your Prebid Server.
- Set Global Parameters - let bidders know important data about the page, privacy consent, and other settings.
- Work with your Prebid Server team to create the adunit configIds that will be used in the app.
- Set up AdMob Mediation Groups and Custom Events. See AdOps guidance
- Link Prebid SDK AdUnit code to your app’s AdUnits for the adunits that your business team wants to connect to Prebid with the configIds generated in Step 3. See the adunit-specific instructions below.
Ad Operations Guidance
The Ad Operations team will need to create a Mediation Group in AdMob.
Rendering and Tracking
This information may be useful when comparing data across various reporting systems:
| Scenario | Tracked? |
|---|---|
| Fires Prebid win event | yes |
| Fires Prebid imp event | yes |
| Fires OpenRTB burl | yes (1) |
| Fires OpenRTB nurl | yes (1) |
| Fires OpenMeasurement events | yes |
Notes:
- OpenRTB
burlandnurlare utilized in a PrebidMobile SDK v3.0.0.
Setup
To integrate Prebid Adapters for AdMob just add the following lines into your build.gradle files:
Root build.gradle
allprojects {
    repositories {
      ...
      mavenCentral()
      ...
    }
}
App module build.gradle:
implementation('org.prebid:prebid-mobile-sdk-admob-adapters:x.x.x')
Adunit Specific Instructions
Banners
Integration example:
// 1. Create AdView and AdRequest
bannerView = AdView(activity)
bannerView?.adSize = AdSize.BANNER
bannerView?.adUnitId = adUnitId
adWrapperView.addView(bannerView)

val extras = Bundle()
val request = AdRequest
        .Builder()
        .addNetworkExtrasBundle(PrebidBannerAdapter::class.java, extras)
        .build()

// 2. Create AdMobBannerMediationUtils
val mediationUtils = AdMobBannerMediationUtils(extras, bannerView)

// 3. Create MediationBannerAdUnit
adUnit = MediationBannerAdUnit(
    wrapper.context,
    configId,
    org.prebid.mobile.rendering.bidding.data.AdSize(width, height),
    mediationUtils
)
adUnit?.setRefreshInterval(autoRefreshTime / 1000)

// 4. Make a bid request
adUnit?.fetchDemand { result ->
    Log.d("Prebid", "Fetch demand result: $result")

    // 5. Request the ad
    bannerView?.loadAd(request)
}
Step 1: Create AdView and AdRequest
This step is the same as for the original AdMob integration. You don’t have to make any modifications here.
Step 2: Create AdMobMediationBannerUtils
The AdMobBannerMediationUtils is a helper class, which performs certain utility work for the MediationBannerAdUnit, like passing the targeting keywords to the adapters and checking the visibility of the ad view.
Step 3: Create MediationBannerAdUnit
The MediationBannerAdUnit is part of the prebid mediation API. This class is responsible for making the bid request and providing the winning bid and targeting keywords to the mediating SDKs.
Step 4: Make a bid request
The fetchDemand method makes a bid request to the prebid server and provides a result in a completion handler.
Step 5: Make an Ad Request
Now you should just make a regular AdMob’s ad request. Everything else will be handled by GMA SDK and prebid adapters.
Interstitials
Integration example:
// 1. Create AdRequest
val extras = Bundle()
val request = AdRequest
    .Builder()
    .addNetworkExtrasBundle(PrebidInterstitialAdapter::class.java, extras)
    .build()

// 2. Create AdMobInterstitialMediationUtils
val mediationUtils = AdMobInterstitialMediationUtils(extras)

// 3. Create MediationInterstitialAdUnit
adUnit = MediationInterstitialAdUnit(
    activity,
    configId,
    AdUnitFormat.BANNER,
    mediationUtils
)

// 4. Make a bid request
adUnit?.fetchDemand { result ->
    Log.d("Prebid", "Fetch demand result: $result")

    // 5. Make an ad request
    InterstitialAd.load(activity, adUnitId, request, object : InterstitialAdLoadCallback() {
        override fun onAdLoaded(interstitial: InterstitialAd) {
            interstitialAd = interstitial

            // 6. Display the ad
            interstitialAd?.show(activity)
        }

        override fun onAdFailedToLoad(error: LoadAdError) {
            interstitialAd = null
        }
    })
}
Step 1: Create AdRequest
This step is the same as for original AdMob integration. You don’t have to make any modifications here.
Step 2: Create AdMobInterstitialMediationUtils
The AdMobInterstitialMediationUtils is a helper class, which performs certain utility work for the MediationInterstitialAdUnit, like passing the targeting keywords to adapters.
Step 3: Create MediationInterstitialAdUnit
The MediationInterstitialAdUnit is part of the prebid mediation API. This class is responsible for making a bid request and providing the winning bid and targeting keywords to mediating SDKs.
In order to make a multiformat bid request, set the respective values into the adUnitFormats parameter.
adUnit = MediationInterstitialAdUnit(
            activity,
            configId,
            EnumSet.of(AdUnitFormat.BANNER, AdUnitFormat.VIDEO),
            mediationUtils
        )
Step 4: Make a bid request
The fetchDemand method makes a bid request to the prebid server and provides a result in a completion handler.
Step 5: Make an ad request
Now you should just make a regular AdMob’s ad request. Evetything else will be handled by GMA SDK and prebid adapters.
Step 6: Display an ad
Once you receive the ad it will be ready for display. You can show interstitial right in the listener or later according to the app logic.
Rewarded
Server-side Rewarded Ad Unit Configuration
The Rewarded Ad Unit assumes special behavior that should be configurable by the platform or publisher according to the application or ad experience guides.
Configuration of rewarded ad unit can be done by defining the Prebid Server passthrough extension or by using a stored impression-level request on the server.
Prebid SDK will search for a particular rwdd object in $.seatbid.bid.ext.prebid.passthrough of bid response to configure the behavior and rendering of the Rewarded Ad Unit. The following table describes the structure and usage purpose of rwdd configuration parameters.
| Attribute | Type | Description | Example |
|---|---|---|---|
reward |
object (optional) |
Metadata provided by the publisher to describe the reward. | { |
reward.type |
string | Type of the reward in the app’s coins. | "SuperDollars" |
reward.count |
integer | Amount of coins. | 10 |
reward.ext |
object | For future extensions. | { |
completion |
object (optional) |
Describes the condition when the SDK should send a signal to the app that the user has earned the reward. | { |
completion.banner |
object | Details for banner ad completion. | { |
completion.banner.time |
integer | Period of time the banner ad is on screen. | 5 |
completion.banner.event |
string | URL with custom schema sent by the creative to indicate that the user did earn a reward. | "rwdd://userDidEarnReward" |
completion.video |
object | Details for video ad completion. | { |
completion.video.time |
integer | Period of time the video ad is on screen. | 10 |
completion.video.playbackevent |
string | The playback event stage in the video. | "start", "firstquartile", "midpoint", "thirdquartile", "complete" |
completion.video.endcard |
object | Properties for the end card. | { |
completion.video.endcard.time |
integer | Period of time the end card is on screen. | 5 |
completion.video.endcard.event |
string | URL with custom schema sent by the creative for end card. | "rwdd://userDidEarnReward" |
close |
object (optional) |
Describes the ad close behavior after the reward is earned. | { |
close.postrewardtime |
integer | Time interval (seconds) after reward event when SDK should close interstitial. | 3 |
close.action |
string | Action SDK should make: "autoclose" (close interstitial) or "closebutton" (show close button) |
"autoclose" |
An example of an impression-level stored request:
{
  "video": {
    "h": 480,
    "w": 320,
    "mimes": ["video/mp4"],
    "linearity": 1,
    "placement": 2,
    "playbackmethod": [2]
  },
  "ext": {
    "prebid": {
      "passthrough": [
        {
          "type": "prebidmobilesdk",
          "rwdd": {
            "reward": {
              "type": "SuperDollars",
              "count": 10
            },
            "completion": {
              "video": {
                "endcard": {
                  "time": 5
                }
              }
            },
            "close": {
              "postrewardtime": 3,
              "action": "autoclose"
            }
          }
        }
      ]
    }
  }
}
More details about the SDK behavior according to the rwdd configuration you can find in the GitHub Proposal.
Integration example
// 1. Create AsRequest
val extras = Bundle()
val request = AdRequest
    .Builder()
    .addNetworkExtrasBundle(PrebidRewardedAdapter::class.java, extras)
    .build()

// 2. Create AdMobRewardedMediationUtils
val mediationUtils = AdMobRewardedMediationUtils(extras)

// 3. Create MediationRewardedVideoAdUnit
adUnit = MediationRewardedVideoAdUnit(activity, configId, mediationUtils)

// 4. Make a bid request
adUnit?.fetchDemand { result ->
    Log.d("Prebid", "Fetch demand result: $result")

    // 5. Make an ad request
    RewardedAd.load(activity, adUnitId, request, object : RewardedAdLoadCallback() {
        override fun onAdLoaded(ad: RewardedAd) {
            Log.d(TAG, "Ad was loaded.")
            rewardedAd = ad

            // 6. Display an ad
            rewardedAd?.show(activity) { rewardItem ->
                val rewardAmount = rewardItem.amount
                val rewardType = rewardItem.type
                Log.d(TAG, "User earned the reward ($rewardAmount, $rewardType)")
            }
        }

        override fun onAdFailedToLoad(adError: LoadAdError) {
            Log.e(TAG, adError.message)
            rewardedAd = null
        }
    })
}
Step 1: Create AdRequest
This step is the same as for the original AdMob integration. You don’t have to make any modifications here.
Step 2: Create AdMobRewardedMediationUtils
The AdMobRewardedMediationUtils is a helper class, which performs certain utility work for the MediationInterstitialAdUnit, like passing the targeting keywords to adapters.
Step 3: Create MediationRewardedVideoAdUnit
The MediationRewardedVideoAdUnit is part of the prebid mediation API. This class is responsible for making bid request and managing the winning bid.
Step 4: Make a bid request
The fetchDemand method makes a bid request to the prebid server and provides a result in a completion handler.
Step 5: Make an ad request
Now you should just make a regular AdMob’s ad request. Evetything else will be handled by GMA SDK and prebid adapters.
Step 6: Display an ad
Once you receive the ad it will be ready for display. You can show interstitial right in the listener or later according to the app logic.
Native
Integration example:
// 1. Create AdLoader and AdRequest
val nativeAdOptions = NativeAdOptions
    .Builder()
    .build()

val adLoader = AdLoader
    .Builder(wrapper.context, adUnitId)
    .forNativeAd { ad: NativeAd ->
        nativeAd = ad
        createCustomView(wrapper, nativeAd!!)
    }
    .withAdListener(object : AdListener() {
        override fun onAdFailedToLoad(adError: LoadAdError) {
            Log.e(TAG, "Error: ${adError.message}")
        }
    })
    .withNativeAdOptions(nativeAdOptions)
    .build()

val extras = Bundle()
val adRequest = AdRequest
    .Builder()
    .addNetworkExtrasBundle(PrebidInterstitialAdapter::class.java, extras)
    .build()

// 2. Create Native AdUnit
val nativeAdUnit = NativeAdUnit(configId)

// 3. Configure NativeAdUnit
configureNativeAdUnit(nativeAdUnit)

// 4. Make a bid request
nativeAdUnit.fetchDemand(extras) { resultCode ->
    Log.d(TAG, "Fetch demand result: $resultCode")

    // 5. Make an ad request
    adLoader.loadAd(adRequest)
}
Step 1: Create AdRequest
Prepare the AdLoader and AdRequest objects before you make the bid request. They are needed for prebid mediation utils. Follow the AdMob integration instructions for this step.
Step 2: Create NativeAdUnit
The NativeAdUnit is responsible for making bid requests. Once the bid response is received you can load an ad from AdMob.
Step 3: Configure NativeAdUnit
The bid request for native ad should have a description of expected assets. The full spec for the Native template can be found in the Native Ad Specification from IAB.
Example of creating the assets array and configuring the NativeAdUnit:
private fun configureNativeAdUnit(nativeAdUnit: NativeAdUnit) {

    // Configure Ad Unit
    nativeAdUnit.setContextType(NativeAdUnit.CONTEXT_TYPE.SOCIAL_CENTRIC)
    nativeAdUnit.setPlacementType(NativeAdUnit.PLACEMENTTYPE.CONTENT_FEED)
    nativeAdUnit.setContextSubType(NativeAdUnit.CONTEXTSUBTYPE.GENERAL_SOCIAL)

    // Create the list of required assets
    val title = NativeTitleAsset()
    title.setLength(90)
    title.isRequired = true
    nativeAdUnit.addAsset(title)

    val icon = NativeImageAsset(20, 20, 20, 20)
    icon.imageType = NativeImageAsset.IMAGE_TYPE.ICON
    icon.isRequired = true
    nativeAdUnit.addAsset(icon)

    val image = NativeImageAsset(200, 200, 200, 200)
    image.imageType = NativeImageAsset.IMAGE_TYPE.MAIN
    image.isRequired = true
    nativeAdUnit.addAsset(image)

    val data = NativeDataAsset()
    data.len = 90
    data.dataType = NativeDataAsset.DATA_TYPE.SPONSORED
    data.isRequired = true
    nativeAdUnit.addAsset(data)

    val body = NativeDataAsset()
    body.isRequired = true
    body.dataType = NativeDataAsset.DATA_TYPE.DESC
    nativeAdUnit.addAsset(body)

    val cta = NativeDataAsset()
    cta.isRequired = true
    cta.dataType = NativeDataAsset.DATA_TYPE.CTATEXT
    nativeAdUnit.addAsset(cta)

    // Create the list of required event trackers
    val methods: ArrayList<NativeEventTracker.EVENT_TRACKING_METHOD> = ArrayList()
    methods.add(NativeEventTracker.EVENT_TRACKING_METHOD.IMAGE)
    methods.add(NativeEventTracker.EVENT_TRACKING_METHOD.JS)
    try {
        val tracker = NativeEventTracker(NativeEventTracker.EVENT_TYPE.IMPRESSION, methods)
        nativeAdUnit.addEventTracker(tracker)
    } catch (e: Exception) {
        e.printStackTrace()
    }
}
Step 4: Make a bid request
The fetchDemand method makes a bid request to the prebid server and provides a result in a completion handler.
Step 5: make an ad request
Now load an native ad from AdMob according to the AdMob instructions. Everything else will be handled by GMA SDK and prebid adapters.
Additional Ad Unit Configuration
Ad Position
The adPosition property allows developers to specify the position of the ad within the publisher’s content. This property maps to the pos field in the OpenRTB specification under the imp[].banner or imp[].video objects, depending on the ad format. The possible values for this field could be found in the respective specification.
You can set adPosition by using the following method:
adUnit.setAdPosition(AdPosition.FOOTER);