Prebid SDK Android with the GAM Prebid-Rendered Integration Method
- Overview
- How it Works
- Major Integration Steps
- Ad Operations Guidance
- Event Handlers
- AdUnit-Specific instructions
- Additional Ad Unit Configuration
- Further Reading
Overview
This how-to guide covers the ‘Prebid-Rendered’ approach for integrating the Prebid SDK into your app with the GMA SDK. It utilizes:
- Prebid SDK and Prebid server to handle the bidding and auction process.
- GAM and the Google Mobile Ads (GMA) SDK manage the ad inventory and select the winning ad to display.
- Prebid SDK renders display ads when a Prebid bid wins.
- GMA SDK renders ads when a Prebid bid wins.
If you do not have GMA SDK in the app yet, refer to the Google Integration Documentation.
Alternative Approaches
Another way to integrate GAM into your app is with the GAM Bidding-Only integration.
Tradeoffs between these integration approaches:
| Aspect | Bidding-Only Integration | Prebid-Rendered Integration |
|---|---|---|
| App code has direct access to bids | ||
| Support for MRAID 3.0 | ||
| Support for SKAdnetwork | ||
| Loads data from Prebid Cache | ||
| Supports instream video | ||
| Triggers billing and Notice URLs | ||
| Supports Third Party Rendering libraries |
Notes:
- On one hand, using Prebid Cache reduces the amount of data that must be sent to the mobile device – the body of the creative does not need to be transmitted for bids. On the other hand, though, when a bid wins in the ad server, the body of the creative must be retrieved from the cache.
- It is possible to mix-and-match implementations within an app. e.g. you could implement instream video with the Bidding-Only approach and other adunits with Prebid-Rendered.
Prerequisites
The GAM Prebid-Rendered Integration method assumes that you have the following components:
- Google Ad Manager Account - A GAM account allows you to manage and serve ads within your mobile app. Within this account you’ll need to configure your inventory and create orders for serving ads within your app. This involves defining ad units (spaces within your app where ads will be displayed) and setting up orders and line items to deliver ads to those units. See Prebid’s AdOps Guide for more information.
- Google Mobile Ads (GMA) SDK - This refers to the software development kit provided by Google. You need to ensure that you have the latest version of the GMA SDK supported by Prebid SDK. This SDK integration is necessary to communicate with the ad server and display ads in your app.
- Prebid SDK - You will need the latest version of the Prebid Mobile SDK for either Android or iOS.
- Prebid Server - You will need a cluster of servers running Prebid Server. You can set up your own Prebid Server or work with a Prebid Server managed service. Prebid Server provides you with the following:
- Configuration storage - rather than hardcoding all the details of your current business arrangements in the app, Prebid Server stores which bidders you’re currently working with, their inventory details, and other settings that can be changed without updating your app.
- Server-side auction - the server will make the connections to multiple auction bidding partners so the app doesn’t have to.
- Privacy regulation tools - the server can help your legal team meet different regulatory needs in different jurisdictions by configuring various protocols and anonyimization activities.
How it Works
Here’s how the ad bidding-auction-rendering process works in this integration scenario.
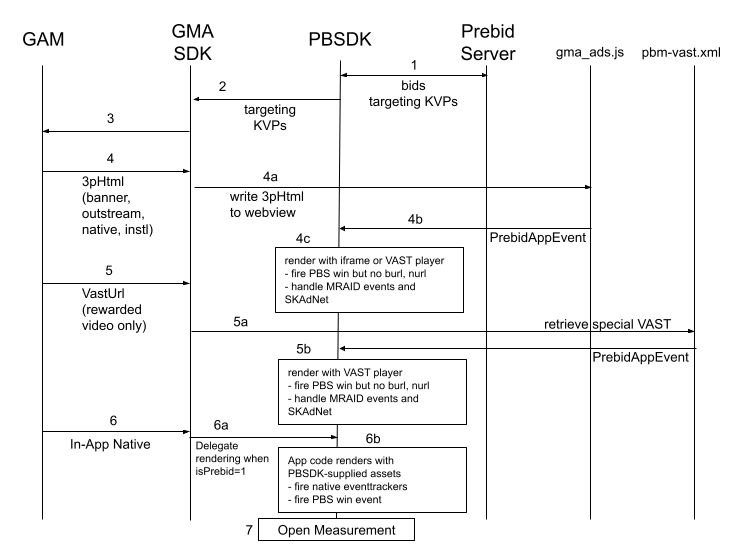
- Prebid SDK calls Prebid Server which supplies one or more bids.
- PBSDK adds targeting values to GMA SDK.
- GMA SDK calls GAM, which makes the ad decision.
- If a 3rd party HTML creative is chosen (banner, native, interstitial, non-instream video):
- GMA SDK writes HTML to a webview, loading google_mobile_app_ads.js.
- This script triggers a “PrebidAppEvent”.
- Which in turn triggers PBSDK to handle the rendering of the creative:
- PBSDK fires the Prebid Server win event.
- If a 3rd party rendering SDK is in use, PBSDK calls it for rendering.
- Otherwise, it writes the creative into an iframe into an internal WebView, replaceing the GAMSDK’s WebView.
- Injects mraid.js into the webview to listen for events from MRAID: change size, etc.
- Sends data to the creative (e.g. ‘viewable’) which may trigger impression tracking within the creative.
- Starting from v3.0.0, the SDK hits the billing and notice urls (burl and nurl).
- If a video VastUrl creative is chosen (rewarded video only):
- The GMA SDK uses the platform video player which loads the special VAST file from the Prebid CDN.
- Prebid SDK watches VAST events for “
PrebidAppEvent ”. When it sees this, it takes over the rendering:- PBSDK fires the PBS win event. Starting from v3.0.0, the SDK also hits the billing and notice urls (burl and nurl).
- If the response indicates a 3rd party rendering SDK, PBSDK will call it.
- Otherwise:
- PDBSK renders with the platform-standard VAST player.
- It uses the VAST from the bid response, not from Prebid Cache.
- The player fires any Impression tags in the VAST.
- PBSDK handles MRAID events.
- The app is called to handle the reward.
- If an In-App Native format is chosen:
- The GMA SDK delegates the rendering of native to the App and PBSDK when a special signal is specified.
- The app code gets the native assets from PBSDK. The app is coded to render the ad.
- PBSDK fires the eventtrackers when appropriate.
- The PBS win event is fired. Starting from v3.0.0, the SDK also hits the billing and notice urls (burl and nurl).
- Open Measurement events are handled directly by the Prebid SDK.
- If a 3rd party rendering SDK is used to render, then it will handle Open Measurement.
Major Integration Steps
Assuming your app already has AdUnits integrated with the GMA SDK, the technical implementation of Prebid mobile into your app will involve these major steps:
- Initialize the Prebid SDK - create a connection to your Prebid Server.
- Set Global Parameters - let bidders know important data about the page, privacy consent, and other settings.
- Work with your Prebid Server team to create the adunit configIds that will be used in the app.
- Set up GAM orders, line items, and creatives. See AdOps guidance
- Link Prebid AdUnit code to your GMA AdUnits - for any adunits that your business team wants to connect to Prebid with the configIds generated in Step 3. See the adunit-specific instructions below.
Ad Operations Guidance
The AdOps team will need to create line items in GAM. The creatives used depend on which media formats your adunits utilize:
| AdUnit Format | Line Item Targeting | Creative Type | Prebid Cache? | Ad Ops Details |
|---|---|---|---|---|
| HTML banner, interstitial banner or video, non-instream video | hb_pb hb_format=banner |
3rd party HTML that loads google_mobile_app_ads.js | no | link |
| Instream Video | hb_pb hb_format=video inventoryType in (instream, mobile app) |
VastUrl pointing to Prebid Cache | yes | link |
| Rewarded Video | hb_pb hb_format=video inventoryType in (instream, mobile app) rewarded adunits |
VastUrl pointing to prebid-mobile-rewarded-vast.xml | no | link |
| In-app native | hb_pb hb_format=native |
GAM native | no | link |
Notes:
- Instream video requires the Bidding-Only application coding integration approach. However, the line item setup is the same.
- You may need up to 4 sets of line items to support Prebid Mobile depending on adunit types. If you also run Prebid.js or AMP, please see line item considerations for more information.
- Discuss the Prebid Cache column with the Prebid Server team. They can set up the “top-level stored request” for your account to cache or not cache requests as needed.
Rendering and Tracking
This information may be useful when comparing data across various reporting systems:
| Scenario | 3pHTML Creative | VastUrl Creative | GAM Native Creative |
|---|---|---|---|
| Rendering Method | js in iframe fires an event | GMA SDK player | App code with data from PBSDK |
| Fires Prebid win event | always | never | always |
| Fires Prebid imp event | always | VAST impression tag | never |
| Fires OpenRTB burl | always (1) | n/a | never |
| Fires OpenRTB nurl | always (1) | n/a | never |
| Fires OpenMeasurement events | PBSDK | n/a | PBSDK |
Notes:
- OpenRTB
burlandnurlare utilized in a PrebidMobile SDK v3.0.0.
Event Handlers
First, a little bit of setup is needed.
Integrate Event Handlers
The Prebid SDK supples a set of classes called the ‘GAM Event Handlers’ that wrap the GAM Ad Units and manage them in the In-App Bidding flow. These classes are provided in the form of library that could be added to the app via Gradle:
Root build.gradle
allprojects {
    repositories {
      ...
      mavenCentral()
      ...
    }
}
App module build.gradle:
implementation('org.prebid:prebid-mobile-sdk-gam-event-handlers:x.x.x')
AdUnit-Specific instructions
This section covers integration details for different ad formats. In each scenario, you’ll be asked for a configId - this is a key worked out with your Prebid Server provider. It’s used at runtime to pull in the bidders and parameters specific to this adunit. Depending on your Prebid Server partner, it may be a UUID or constructed out of parts like an account number and adunit name.
Banners
Display Banners
To integrate the banner ad you need to implement three easy steps:
// 1. Create a banner custom event handler for GAM ad server.
val eventHandler = GamBannerEventHandler(requireContext(), GAM_AD_UNIT, GAM_AD_SIZE)

// 2. Create a bannerView instance and provide the GAM event handler
bannerView = BannerView(requireContext(), configId, eventHandler)
// (Optional) set an event listener
bannerView?.setBannerListener(this)

// Add bannerView to your viewContainer
viewContainer?.addView(bannerView)

// 3. Execute the loadAd function.
bannerView?.loadAd()
Pay attention that the
loadAd() should be called on the main thread.
Step 1: Create Event Handler
Prebid SDK’s GAM event handlers are special containers that wrap GAM Ad Views and help to manage collaboration between GAM and Prebid views.
Important: you should create and use a unique event handler for each ad view.
To create the event handler you should provide a GAM Ad Unit Id and the list of available sizes for this ad unit.
Step 2: Create Ad View
BannerView - is the view that will display a particular ad. It should be added to the UI. To create it you should provide:
- configId - an ID of a Stored Impression on the Prebid server
- eventHandler - the instance of the banner event handler
Also, you should add the instance of BannerView to the UI.
And assign the listeners for processing ad events.
Step 3: Load the Ad
Call the loadAd() method to make a bid request.
Non-Instream Video
For Non-Instream Video you also need to specify video placement type of the expected ad:
bannerView.videoPlacementType = PlacementType.IN_BANNER // or any other available type
Migrating banners from a Bidding-Only integration
GAM setup:
- Leave the original order and ad units as is. They are not relevant for the rendering approach but they will serve ads for released applications.
- Create new GAM ad unit.
- Setup new GAM Order for rendering approach.
Integration:
- Replace the
AdManagerAdViewwithBannerViewin the UI. - Implement the interface
BannerViewListener. - Remove both
AdManagerAdViewandAdManagerAdRequestand implement anAdListener. - Remove the original
BannerAdUnit. - Follow the instructions to integrate Banner API.
Interstitials
To integrate an interstitial ad follow these steps:
// 1. Create an interstitial custom event handler for GAM ad server.
val eventHandler = GamInterstitialEventHandler(requireContext(), gamAdUnit)

// 2. Create an interstitialAdUnit instance and provide GAM event handler
interstitialAdUnit = InterstitialAdUnit(requireContext(), configId, minSizePercentage, eventHandler)
// (Optional) set an event listener
interstitialAdUnit?.setInterstitialAdUnitListener(this)

// 3. Execute the loadAd function.
interstitialAdUnit?.loadAd()

//....

// 4. After ad is loaded you can execute the `show` function to trigger ad display
interstitialAdUnit?.show()
Pay attention that the
loadAd() should be called on the main thread.
In order to make a multiformat bid request, set the respective values into the adUnitFormats parameter.
interstitialAdUnit = InterstitialAdUnit(
                        requireContext(),
                        configId,
                        EnumSet.of(AdUnitFormat.BANNER, AdUnitFormat.VIDEO),
                        eventHandler)
Step 1: Create Event Handler
GAM’s event handlers are special containers that wrap the GAM Ad Views and help to manage collaboration between GAM and Prebid views.
Important: you should create and use a unique event handler for each ad view.
To create an event handler you should provide a GAM Ad Unit.
Step 2: Create Interstitial Ad Unit
InterstitialAdUnit - is an object that will load and display a particular ad. To create it you should provide:
- configId - an ID of a Stored Impression on the Prebid server
- minSizePercentage - specifies the minimum width and height percent an ad may occupy of a device’s screen.
- eventHandler - the instance of the interstitial event handler
Also, you can assign the listeners for processing ad events.
NOTE: minSizePercentage - plays an important role in a bidding process for display ads. If the provided space is too small demand partners won’t respond with bids.
Step 3: Load the Ad
Call the loadAd() method make a bid request. The ad unit will load an ad and will wait for explicit instructions to display the Interstitial Ad.
Step 4: Show the Ad when it is ready
The most convenient way to determine if the interstitial ad is ready for displaying is to listen to the listener method:
override fun onAdLoaded(interstitialAdUnit: InterstitialAdUnit) {
//Ad is ready for display
}
Migrating interstitials from a Bidding-Only integration
GAM setup:
- Leave the original order and ad units as is. They are not relevant for the rendering approach but they will serve ads for released applications.
- Create a new GAM ad unit.
- Setup a new GAM Order for rendering approach.
Integration:
- Replace the
AdManagerInterstitialAdwithInterstitialRenderingAdUnit. - Implement the interface for
InterstitialEventListener. - Remove both
AdManagerInterstitialAdandAdManagerAdRequest. - Remove the original
InterstitialAdUnit. - Follow the instructions to integrate Interstitial API.
Rewarded
Server-side Rewarded Ad Unit Configuration
The Rewarded Ad Unit assumes special behavior that should be configurable by the platform or publisher according to the application or ad experience guides.
Configuration of rewarded ad unit can be done by defining the Prebid Server passthrough extension or by using a stored impression-level request on the server.
Prebid SDK will search for a particular rwdd object in $.seatbid.bid.ext.prebid.passthrough of bid response to configure the behavior and rendering of the Rewarded Ad Unit. The following table describes the structure and usage purpose of rwdd configuration parameters.
| Attribute | Type | Description | Example |
|---|---|---|---|
reward |
object (optional) |
Metadata provided by the publisher to describe the reward. | { |
reward.type |
string | Type of the reward in the app’s coins. | "SuperDollars" |
reward.count |
integer | Amount of coins. | 10 |
reward.ext |
object | For future extensions. | { |
completion |
object (optional) |
Describes the condition when the SDK should send a signal to the app that the user has earned the reward. | { |
completion.banner |
object | Details for banner ad completion. | { |
completion.banner.time |
integer | Period of time the banner ad is on screen. | 5 |
completion.banner.event |
string | URL with custom schema sent by the creative to indicate that the user did earn a reward. | "rwdd://userDidEarnReward" |
completion.video |
object | Details for video ad completion. | { |
completion.video.time |
integer | Period of time the video ad is on screen. | 10 |
completion.video.playbackevent |
string | The playback event stage in the video. | "start", "firstquartile", "midpoint", "thirdquartile", "complete" |
completion.video.endcard |
object | Properties for the end card. | { |
completion.video.endcard.time |
integer | Period of time the end card is on screen. | 5 |
completion.video.endcard.event |
string | URL with custom schema sent by the creative for end card. | "rwdd://userDidEarnReward" |
close |
object (optional) |
Describes the ad close behavior after the reward is earned. | { |
close.postrewardtime |
integer | Time interval (seconds) after reward event when SDK should close interstitial. | 3 |
close.action |
string | Action SDK should make: "autoclose" (close interstitial) or "closebutton" (show close button) |
"autoclose" |
An example of an impression-level stored request:
{
  "video": {
    "h": 480,
    "w": 320,
    "mimes": ["video/mp4"],
    "linearity": 1,
    "placement": 2,
    "playbackmethod": [2]
  },
  "ext": {
    "prebid": {
      "passthrough": [
        {
          "type": "prebidmobilesdk",
          "rwdd": {
            "reward": {
              "type": "SuperDollars",
              "count": 10
            },
            "completion": {
              "video": {
                "endcard": {
                  "time": 5
                }
              }
            },
            "close": {
              "postrewardtime": 3,
              "action": "autoclose"
            }
          }
        }
      ]
    }
  }
}
More details about the SDK behavior according to the rwdd configuration you can find in the GitHub Proposal.
Integration example
Displaying the Rewarded Ad is the same as displaying an Interstitial Ad, but it adds ability to handle reward. To display a Rewarded Ad follow these steps:
// 1. Create a rewarded custom event handler for GAM ad server.
val eventHandler = GamRewardedEventHandler(requireActivity(), gamAdUnitId)

// 2. Create a rewardedAdUnit instance and provide the GAM event handler
rewardedAdUnit = RewardedAdUnit(requireContext(), configId, eventHandler)

// You can also set an event listener, this step is optional.
rewardedAdUnit?.setRewardedAdUnitListener(this)

// 3. Execute the loadAd function.
rewardedAdUnit?.loadAd()

//...

// 4. After the ad is loaded you can execute the `show` function to display the ad.
rewardedAdUnit?.show()
Pay attention that the
loadAd() should be called on the main thread.
Step 1: Create Event Handler
GAM’s event handlers are special containers that wrap the GAM Ad Views and help to manage collaboration between GAM and Prebid views.
Important: you should create and use a unique event handler for each ad view.
To create an event handler you should provide a GAM Ad Unit.
Step 2: Create Rewarded Ad Unit
RewardedAdUnit - is an object that will load and display the particular ad. To create it you should provide
- configId - is an ID of a Stored Impression on the Prebid server
- eventHandler - is the instance of the rewarded event handler
You can also assign the listener for processing ad events.
Step 3: Load the Ad
Call the loadAd() method to make a bid request. The ad unit will load an ad and will wait for explicit instructions to display the Rewarded Ad.
Step 4: Display the Ad when it is ready
The most convenient way to determine if the ad is ready for displaying is to listen for the listener method:
override fun onAdLoaded(rewardedAdUnit: RewardedAdUnit) {
//Ad is ready for display
}
Step 5: Handle a reward
Handle earning the reward in the appropriate method. Important: a reward can be null.
override fun onUserEarnedReward(rewardedAdUnit: RewardedAdUnit?, reward: Reward?) {
    if (reward != null) {
        val rewardType = reward.type
        val rewardCount = reward.count
        val rewardExt = reward.ext
        // Process the reward
    }
}
Migrating rewarded video from a Bidding-Only integration
GAM setup:
- Leave the original order and ad units as is. They are not relevant for the rendering approach but they will serve ads for released applications.
- Create a new GAM ad unit.
- Setup a new GAM Order for rendering approach.
Integration:
- Replace the
RewardedAdwithRewardedAdUnit. - Implement the interface for
RewardedAdUnitListener. - Remove the original
RewardedVideoAdUnit. - Follow the instructions to integrate Rewarded API.
Additional Ad Unit Configuration
Ad Position
The adPosition property allows developers to specify the position of the ad within the publisher’s content. This property maps to the pos field in the OpenRTB specification under the imp[].banner or imp[].video objects, depending on the ad format. The possible values for this field could be found in the respective specification.
You can set adPosition by using the following method:
adUnit.setAdPosition(AdPosition.FOOTER);