Google Ad Manager with Prebid Step by Step
- Prerequisites
- Create a Line Item
- Targeting inventoryType
- Long-Form (OTT) Video
- Add the Creatives
- Duplicate the Creative
- Attach Creatives to Line Item
- Duplicate Line Item
- Additional Bidders
- Further Reading
This guide contains step-by-step instructions for manually setting up line items in Google Ad Manager (GAM) to work with Prebid. These instructions describe only the specific settings required for Prebid, they are not intended to be comprehensive instructions that replace or duplicate the GAM documentation.
Because integrating with Prebid could mean having to create thousands of line items, most companies will automate these steps. We’re showing them here so you can manually create the line items if you need or want to, and also to provide context for the automation.
Prebid provides a script you can use to automate these steps: Prebid Line Item Manager.
Prerequisites
Before you begin, we recommend you read through our Planning Guide to make sure you know what your configuration is going to look like and you’ve thoroughly documented your decisions.
Create Advertisers and Orders
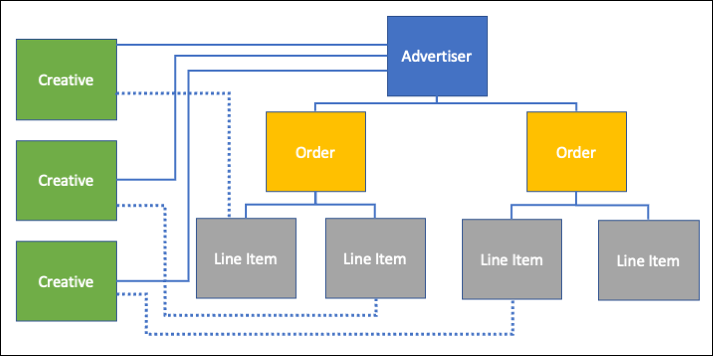
GAM works as a hierarchical structure, where line items are children of orders, and orders are children of advertisers. You must have your advertisers and orders set up before you can start creating line items and creatives. The advertisers you create for Prebid will typically depend on whether you’re sending all bids or only the top price bid to the ad server.
- Send Top Bid: Create one general Prebid advertiser
- Send All Bids: Two choices:
- Create one Prebid advertiser per bidder where Orders are organized by bidder, with one or more orders containing line items targeted towards a single bidder. This approach lets you track bidders as advertisers in your ad server reports.
- Create one general Prebid advertiser. This approach simplifies campaign setup by allowing all line items to share one set of creatives.
Note that GAM has a limit of 450 line items per order. It’s quite likely that you’ll need more than one order to contain all of the line items.
Create Native Template
If you’re working with native inventory, you must have your native template created and stored before you begin creating your line item. See GAM Step by Step - Native Creatives.
Create Inventory Keys and Values
When you create your line item, you’ll be targeting key-value pairs that are being sent with the ad request to the ad server. Any keys you target need to be defined in GAM before you can use them in your line items.
To define new keys, in GAM go to Inventory > Key-Values and enter your Prebid-specific keys, e.g. hb_pb, hb_adid, hb_size, hb_format, etc.
You can also define accepted values for the keys, but you don’t need to. If you create Dynamic keys, values can be added when you set up your line item.
Key names in GAM have a maximum length of 20 characters; any keys passed to GAM longer than that will be truncated. This means that if Prebid passes in the key hb_format_BidderWithALongName, GAM will truncate it to hb_format_BidderWith. When you create your keys, you must use the truncated name.
See Key Values for information on the keys you’ll need.
Create a Line Item
Depending on your scenario, you will likely need several groups of line items. See the line item essentials guide for details. How many line items are in each group depends on the price granularity.
For instance, if you’re running both Prebid.js and Prebid Mobile, you should consider having 2 sets of banner line items and 2 sets of video line items. If your banner line items are medium granularity (201 line items), and your video line items are custom granularity (300 line items), then you’ll go through this line item creation process 1002 times. You’ll need at least 3 orders to contain them, but it would be more convenient to have 4 orders in this scenario: one for each group.
This is why automated tools are important when setting up your ad server for header bidding. If you don’t have an automated tool, consider Prebid’s line item manager or utilize low price granularities.
The rest of this document assumes you’re going to create line items manually. For each line item, open the order you want to associate the line item with and click New line item.
General Settings
From the Settings tab, do the following:
- Select your Ad type:
- Prebid.js: Banner/In-Renderer Video/Native/AMP: Click Select display ad.
- Prebid.js: Instream Video/Audio: Click Select video or audio ad.
- Prebid Mobile: Banner/Native: Click Select display ad.
- Prebid Mobile: All forms of Video/Audio: Click Select video or audio ad.
Note: “In-renderer video” is the term Prebid uses to cover everything that’s not “instream video”. i.e. Accompanying Content, Interstitial, Standalone.
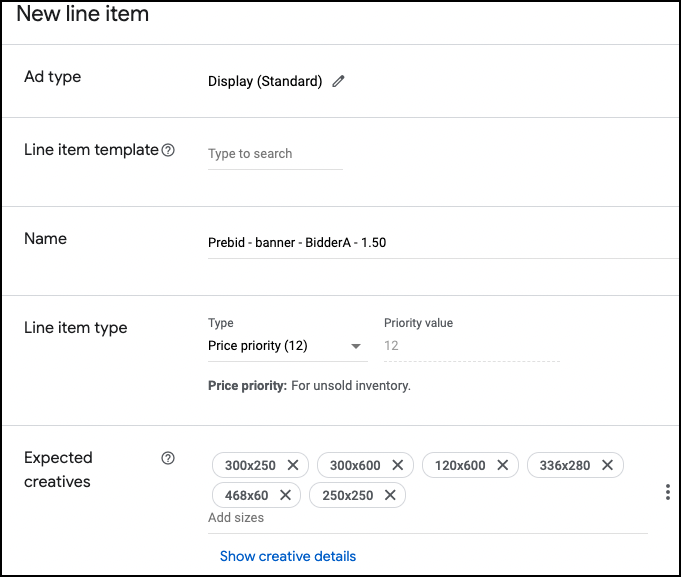
- Enter the Name of your line item. Suggested format: Prebid – format - bidder – price bucket. For example,
Prebid – banner - BidderA - 1.50.
- Set the Line Item Type to Price priority (12). (This will most likely be higher for deals. See Deals in Prebid for more information.)
- Enter your Expected Creatives:
- Display and Video: Select the sizes of all ad slots included in the Prebid process.
- Native: Select a native template. (See GAM Step by Step - Native Creatives for instructions on creating native templates.)
- For Long-Form (OTT) Video: If you’re using competitive exclusions, under Additional settings enter the value for competitive exclusions in the Label field. This value will be included in your targeting within the value for the
hb_pb_cat_durkey. See Targeting below for more information.
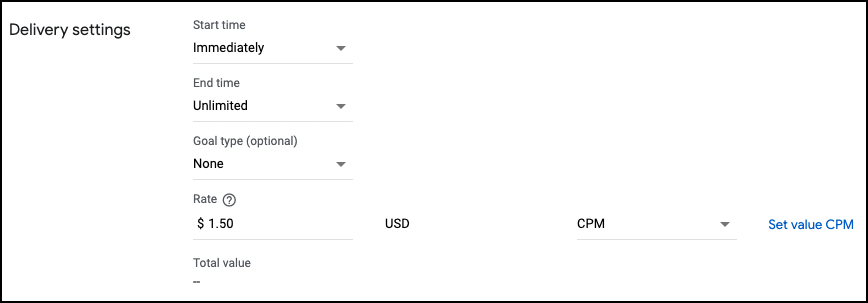
- Under Delivery settings:
- Set Start time to Immediately.
- Set End time to Unlimited.
- Set Rate to your [price bucket].
- Set Goal type to None.
- Under Adjust delivery, set Display creatives to One or more and Rotate creatives to Evenly. You can leave the defaults for everything else.
Targeting
Targeting the price bucket (hb_pb)
The header bidding “price bucket” is the key piece of ad server targeting.
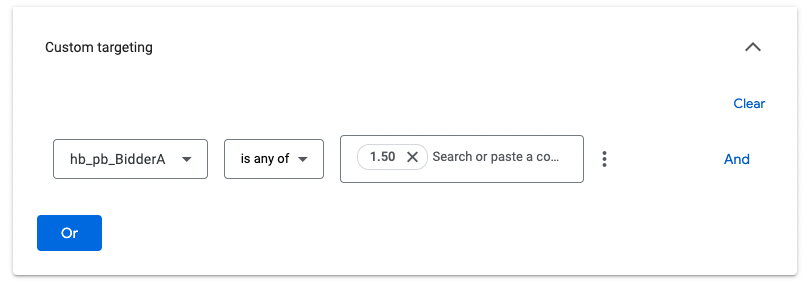
Under Add targeting, expand Custom targeting.
These instructions assume you’re sending all bids to the ad server (the default). If you’re sending only the top price bid, your targeting keys will not include the bidder code. For example, rather than targeting price buckets with hb_pb_BidderA, you’ll target hb_pb. See Send All Bids vs Top Price for more information.
Select the price bucket key: hb_pb_BIDDERCODE (where BIDDERCODE is the actual code for your bidder, such as hb_pb_BidderA).
Leave is any of and enter (or select) your price bucket.
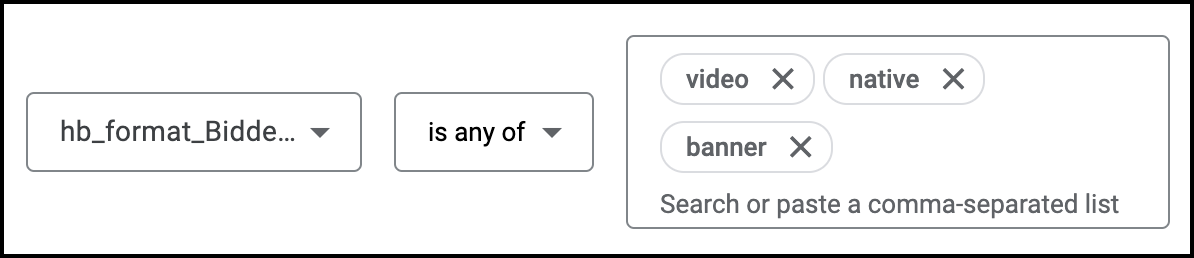
Targeting the format (hb_format)
If you’re running just Prebid.js, there’s no need for adding hb_format to the target. GAM knows which requests are coming from the video IMA SDK and will choose the right line item.
However, for Prebid Mobile, things are different. If you run Prebid Mobile with or without Prebid.js, it’s recommended that you put hb_format targeting on all line items.
- Prebid.js display: hb_format is any of banner, video, native
- Prebid.js video: hb_format is any of video
- Prebid Mobile display: hb_format is any of banner, native
- Prebid Mobile video: hb_format is any of video
If running “Send All Bids” mode, use hb_format_BIDDER instead of hb_format.
Targeting inventoryType
GAM recognizes these “inventoryTypes”: Display, Instream Video, and Mobile App.
The only time you’ll need to update a line item’s inventoryType is for Prebid Mobile video line items. In that scenario you’ll need to add the “Mobile App” inventoryType.
Long-Form (OTT) Video
Targeting Long form video can create a lot of line items. It’s recommended that you keep your price granularity low.
For long-form video the custom key hb_pb_cat_dur_BIDDERCODE is required. The value of this key breaks down like this:
- _pb represents the price bucket. This is the currency amount entered in the Rate field of the Settings section.
- _cat indicates the competitive exclusion industry code. (For engineering information, refer to the Category Translation module). This is the value entered in the Label field for the purpose of competitive exclusion. Having this value in the target helps GAM choose the line items that declare the competitive exclusion label. If you are not using competitive exclusion, you can omit this portion of the value.
- _dur is the length of the video in seconds. This is the value listed in the Max duration field in the Creative forecasting defaults section. Having this value in the target helps GAM choose the line items whose creatives are set up with the right duration.
For example, for a line item with a $10.00 CPM entered in the Rate field, a Label of “news”, and 30s entered in the Duration field, you would enter the following in the Custom key-value field: hb_pb_cat_dur_BIDDERCODE = 10.00_news_30s. If you’re not using competitive exclusion, you can have a value such as this: hb_pb_cat_dur_BIDDERCODE = 10.00_30s.
For deals, the Rate portion of this value will contain the dealID if deals are prioritized. See Getting Started with Long Form Video for engineering information.
Engineers will need to include the Adpod module and the Category Translation module in Prebid.js to implement long-form video bidding.
Creative-level Targeting
In the Expected Creatives section, you can add targeting that applies to creatives rather than to the entire line item. For Prebid you might want to do this if you’re going to use a single line item for multiple formats, or if you have multiple video cache locations.
To set creative-level targeting, do the following:
- In the line item’s Expected creatives box, enter the creative size or sizes.
- Click Show creative details (for display) or Expand all (for video).
- In the first creative size box, under Creative targeting click Add targeting and select Add new targeting. This slides out the Creative targeting window.
- Expand Custom targeting and enter the appropriate key values.
Repeat the preceding steps for each creative in the line item.
Save the Line Item
You’ve now added all fields necessary for targeting Prebid line items. You can add any other line item options you would normally use, such as additional targeting for geography. When you’ve filled in all the above fields, click Save to save your line item.
Add the Creatives
The process you use to create your creatives differs based on the media type. Follow the instructions for the appropriate media type:
If you’re implementing Prebid Mobile with the Prebid-Rendered integration type, see the AdOps Guide to setting up GAM for Prebid-Rendered Mobile.
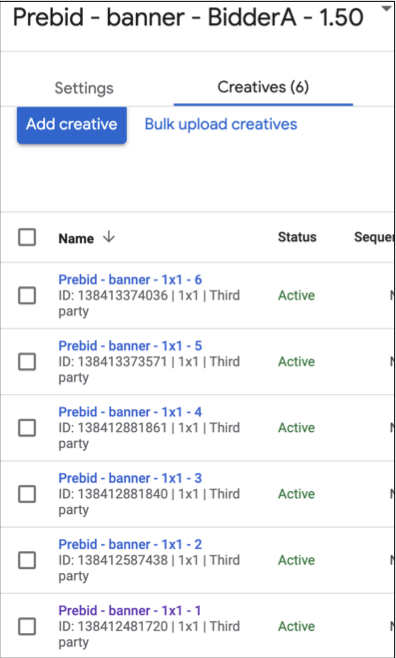
Duplicate the Creative
After you’ve created your creatives, you’ll need to associate a creative with each size in your line item. Even if you’ve specified only one or two sizes, you might actually want more creatives than you have sizes. Because the creative body itself is identical no matter which size you’re associating it with, you can duplicate the creative so you have as many as you need.
You need extra copies of the creative because GAM will display only one creative per line item per page. See Creative Considerations for more information.
- Select Delivery > Creatives.
- Find the creative you want to duplicate and click the check mark to the left.
- At the top of the creatives list, click Copy. This will create a copy of your creative in the same location, with “(Copy)” appended to the name.
- Continue to click Copy to create as many creatives as you’ll need for your line item.
- After you’ve created the copies, click into each one and change the Name. If you’ve followed our suggestions, you can name each one the same but append a subsequent number. For example,
Prebid – banner – 1x1 – 1,Prebid – banner – 1x1 – 2, etc.
Attach Creatives to Line Item
Now we need to attach the creatives to your line item. Navigate to Delivery > Line items and select the line item you created earlier.
Under the Creatives tab, you’ll see a yellow box showing each size you entered for your line item that doesn’t yet have a creative attached. For each size in the list, do the following:
- Click Existing creative. A message at the top of the screen will tell you that creatives have been filtered based on size. Click Undo.

- Click Creatives.
- Select one of the creatives you just created and click Save. (If you have more creatives than you do sizes, you can select multiple creatives before clicking Save.)
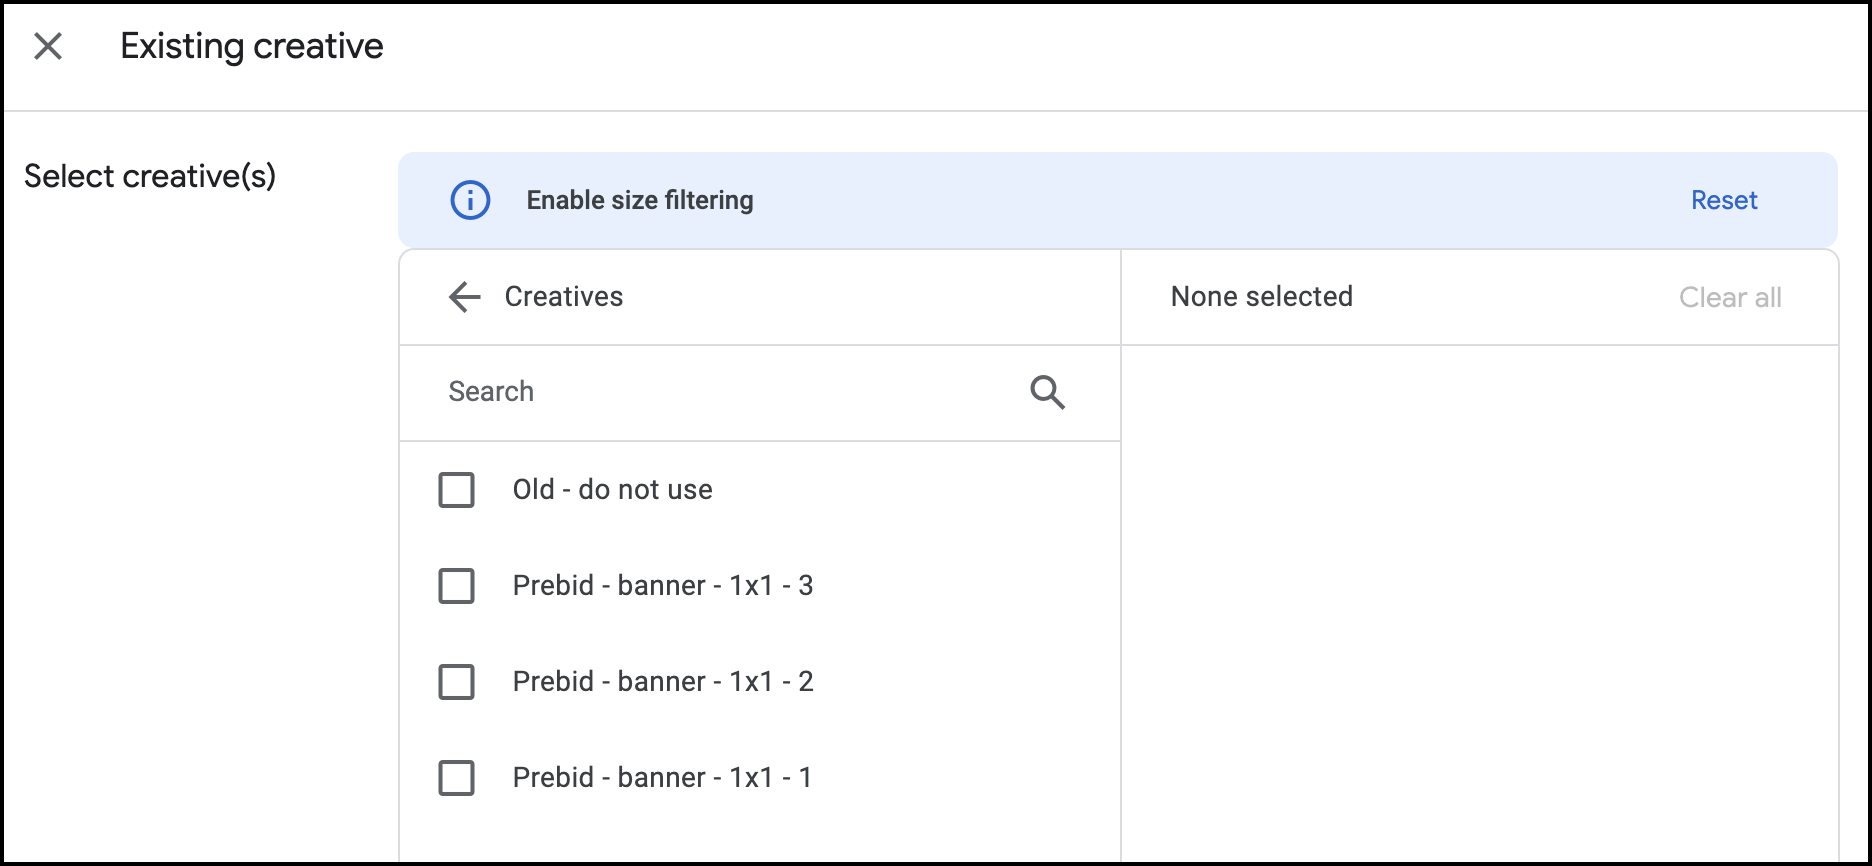
Repeat the preceding steps until all the sizes in your line item have creatives associated with them. When you’re done, the Creatives tab under your line item will show a list of all the associated creatives.
Duplicate Line Item
You’ve now created a line item for one price bucket for a single bidder. Next you need to create line items for the rest of the price buckets for that bidder. The simplest way to do that (outside of automation) is to duplicate the line item you just created.
- From Display > Line Items, click the check box next to your line item.
- Select Copy to from the action bar that appears.
- In the Copy line item window, select Copy and share creatives, and copy to Same order.
- Input the number of copies you need to make to cover all price buckets for the bidder.
- Click OK.
You now need to click into each line item to change the following values to reflect the new price bucket:
- Rate
- Name
- hb_pb_BIDDERCODE key value
- Long-form video only: hb_pb_cat_dur key value
Additional Bidders
If you’re using a Send Top Price cofiguration, at this point you’re done. Congratulations!
If you’re using a Send All Bids configuration, you need to repeat all the above steps for each of your bidders. You can copy one of the existing creatives and change the BIDDERCODE, and you can copy the existing line items and change the names, so you don’t have to completely start from scratch.